When you walk into your garden on a crisp late-winter morning, the sight of your rose bushes might feel a little overwhelming. You see tangled stems, old leaves, and perhaps some thorns that look ready to snag your favorite sweater. However, as someone who has spent over five years working with these beautiful plants, I can tell you that pruning is the most rewarding gift you can give your garden. It is not just about cutting things back; it is about whispering to the plant and telling it exactly how you want it to grow in the coming season. By the time you finish reading this guide, you will feel like an expert, ready to pick up your shears and transform your roses into the pride of your neighborhood.
Step 1: Prepare Your Rose Bush
The first thing you should do when you stand in front of your rose bush is a bit of light housekeeping. I like to start by removing any old leaves that are still clinging to the branches. You might feel bad stripping them off, but those old leaves are often hiding spots for pests and fungal spores that survived the winter. Removing them also lets you see the “skeleton” of the plant clearly so you can make better decisions about where to cut.
While you are down there, take a look at the ground around the base of the rose. You want to clear away any fallen leaves or old mulch. In my experience, this is the most forgotten step, yet it is one of the most important for keeping your roses healthy. Those old leaves on the ground are like a nursery for black spot disease. Once the spring rains start, the water hits those leaves and splashes the fungal spores right back up onto your fresh new growth. Bag this debris up and throw it in the trash; never put diseased rose leaves in your compost pile.

Step 2: Remove the “Four Ds”
Now that you can see the structure of your rose, you are going to look for what I call the “Four Ds.” These are stems that are Dead, Damaged, Diseased, or Dying. Getting rid of these is your top priority because they are doing nothing but holding your plant back.
Dead wood is usually easy to spot because it looks dark brown, black, or gray and feels very brittle. If you aren’t sure if a stem is dead, try the “scratch test.” Use your thumbnail or your pruner blade to lightly scratch the bark. If you see green underneath, the stem is alive. If it is brown all the way through, it is dead. You should cut these dead canes all the way back to the base of the plant or to the point where you find healthy, green wood.
Diseased wood might look shriveled or have strange spots and cankers on it. When you cut into a stem, look at the very center, which we call the “pith.” In a healthy rose, the pith should be a beautiful creamy white, like the inside of an apple. If the pith is tan, brown, or gray, keep cutting further down the stem until you find that healthy white center. This ensures that you have removed all the internal decay that could eventually kill the whole cane.
Step 3: Open Up the Center for Air and Light
Think of your rose bush like a beautiful vase. You want the branches to grow upward and outward, leaving the middle relatively open. Why does this matter? Well, roses breathe through their leaves, and they need sunlight to reach the inner parts of the plant to stay strong. If the middle is too crowded, it stays damp after a rain, which is an open invitation for fungus.
As you look at the bush, identify any branches that are growing inward toward the center. You should remove these. Also, look for branches that are crossing over each other or rubbing together. When branches rub, they create wounds in the bark. Those wounds are like an open door for insects and diseases to enter the plant. Usually, you should pick the healthier, stronger of the two branches and remove the other one.
Step 4: Thin Out the Weak Growth
Once you have cleared the center, it is time to look at the overall “strength” of your plant. A common rule in my five years of gardening is the “pencil rule.” If a stem is thinner than a standard pencil, it probably won’t be strong enough to hold up a heavy rose bloom. These tiny, twiggy stems just clutter up the plant and use up energy that could be better spent elsewhere.
Go ahead and snip these off at the base. Your goal is to be left with three to six strong, vigorous canes that will form the main framework for your flowers. If your rose is very young, you might only have two or three canes, and that is perfectly okay. You are building a foundation for the future.
Step 5: Make the Perfect Cut
This is the part that makes many beginners nervous, but I promise it is simpler than it looks. Every cut you make should be about 1/4 inch above a “bud eye”. Again, these are those little bumps on the stem where a leaf will grow. You should choose a bud eye that is facing outward, away from the center of the plant. This encourages the new branch to grow out, helping you maintain that open vase shape we talked about earlier.
When you make the cut, aim for a 45 degree angle that slopes away from the bud. This is not just for looks! The angle allows rainwater to run off the cut rather than sitting on top of the stem and causing rot. Some experts say the exact angle doesn’t matter as much as having a sharp, clean cut, but I still recommend the 45 degree slope because it has worked perfectly for me and my clients for years.
Why Pruning Your Rose Bushes is Necessary?
Before you make your first cut, it is important to understand why we do this. Many people think roses are fussy, but they are actually very tough shrubs that want to survive. When you prune, you are helping the plant in three major ways. First, you are clearing out the old, “dead wood” so the plant can focus its energy on new, vibrant growth. Second, you are opening up the middle of the bush so air can flow through it. This is vital because roses are prone to diseases like black spot and mildew, which love stagnant, damp air. Finally, you are shaping the plant so that it looks beautiful in your landscape rather than becoming a wild, thorny mess.
Pruning acts as a biological “reset button.” When you remove the tip of a branch, you stop the plant from sending all its energy to that one high point. Instead, the plant redirects its nutrients to “bud eyes” lower down the stem. These are the small bumps where new life begins. By choosing which bud to cut above, you are essentially drawing a map for where the new branches will go. Most of the time, we want them to grow outward to keep the center of the bush clear. This simple act of redirecting energy is what leads to those massive, bouquet-ready blooms you see in professional gardens.
Best Time to Start Your Pruning for Rose Bushes
One of the most common questions I get is about timing. If you prune too early, you might encourage new growth that will get killed by a sudden frost. If you prune too late, the plant has already wasted energy growing leaves that you are just going to cut off. For most of us, the “sweet spot” is in late winter or very early spring, just as the buds begin to swell but before they fully open into leaves.
A great trick I learned years ago is to watch your other plants. When the yellow forsythia bushes in your neighborhood start to bloom, that is nature’s way of telling you it is time to grab your pruners. However, your specific location matters. If you live in a place like California, you might be pruning in January. If you are in a colder climate like the upper Midwest, you might wait until April.
| Climate/Variety | Best Pruning Time | Why This Time? |
|---|---|---|
| Warm Climates (e.g., California) | January | This is when the plant is most dormant. |
| Temperate Climates | February to March | Just as buds swell but before leaves appear. |
| Cold Climates | Late March to April | To avoid late-season frost damage to new stems. |
| Once-Blooming Roses | Summer (after flowering) | These roses bloom on “old wood,” so pruning in spring would cut off your flowers. |
| Tall Hybrid Teas | Late Fall (Light trim) | A quick trim helps prevent wind from rocking the plant and damaging roots in winter. |
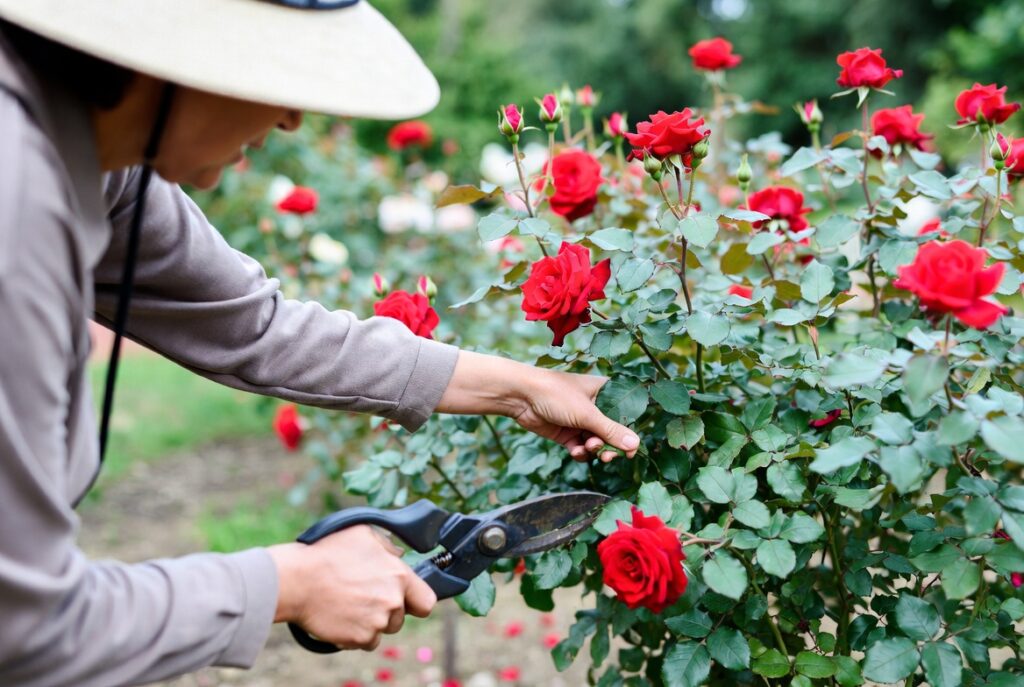
Right Tools for Pruning for Rose Bushes
You wouldn’t try to cook a five-course meal with a dull butter knife, and you shouldn’t try to prune your roses with poor tools. Using the wrong equipment can crush the stems instead of cutting them, which invites disease. Over the years, I have found that a few high-quality tools make the job much faster and easier on your hands.
Your most important tool is a pair of bypass pruners. Unlike “anvil” pruners, which crush the stem against a flat base, bypass pruners work like scissors with two blades that slide past each other. This gives you a clean, surgical cut that heals quickly. For thicker branches—anything wider than a pencil—you will want a pair of loppers, which have long handles for extra leverage. If you are dealing with a very old, neglected rose with thick, woody trunks, a small pruning saw might be necessary.
Don’t forget about your own protection. Rose thorns are no joke. I always recommend heavy-duty leather gloves. Some gardeners prefer “gauntlet” style gloves that reach all the way to your elbows to protect your forearms from those sneaky branches that reach out when you aren’t looking. Finally, keep a bottle of 70\% isopropyl alcohol or a mild bleach solution handy. You should wipe your blades down between every bush to make sure you aren’t spreading any hidden diseases from one plant to another.
| Tool Name | Best Use | Pro Tip |
|---|---|---|
| Bypass Pruners | Small to medium stems | Look for brands like Felco or ARS for long-lasting sharpness. |
| Loppers | Thick canes (over 1/2 inch) | Use these for structural cuts at the base of the plant. |
| Pruning Saw | Very old, woody trunks | Essential for “rejuvenation” pruning on old shrubs. |
| Leather Gloves | Hand and arm protection | Choose thorn-resistant goat skin for the best balance of feel and safety. |
| Disinfectant | Blade cleaning | Dip your tools in alcohol between every plant to prevent disease spread. |
Pruning Different Types of Roses
Not every rose is the same, so you should adjust your “harshness” based on what you are growing. If you have Hybrid Teas or Grandifloras, you can be quite aggressive. I usually prune these down to about 12 to 18 inches tall. They love the heavy “haircut” and will reward you with massive flowers on long stems.
Floribundas are a bit different. They grow in clusters and usually prefer a lighter touch. I like to leave them around 24 to 36 inches tall. If you have Shrub Roses or landscape roses like “Knock Outs,” you can simply reduce their overall size by about one-third to one-half to keep them tidy.
Climbing roses are a special case. You don’t want to cut their long “main canes” unless they are dead or damaged. These main canes are what give the plant its height. Instead, look for the smaller “side shoots” (laterals) growing off those main canes. Prune these side shoots back to about 2 or 3 inches, leaving just two or three buds on each. This will create a wall of flowers in the spring.
Frequently Asked Questions
Yes, for most roses, an annual prune is the best way to keep them healthy and productive. If you skip it, the plant will become a tangled mess of old, weak wood, and you will see fewer flowers each year.
Don’t panic! Roses are incredibly resilient. Even if you make a mistake and cut a cane too short, the plant will almost always grow back from the base. I have seen roses recover beautifully even after being cut nearly to the ground.
You can do “light” pruning in the summer, which we call “deadheading.” This involves removing the faded flowers to encourage the plant to grow more blooms rather than making seeds (hips). Just avoid doing heavy structural pruning in the heat of summer, as it can stress the plant.