You have spent weeks, maybe even months, tending to your garden. You have tilled the soil, planted the seeds, and watched with pride as the first green shoots broke through the earth. But then, you wake up one morning to find your hard work decimated. Leaves are shredded, stems are chewed, and your beautiful harvest-to-be is disappearing down the throat of a hungry rabbit or a colony of aphids. It is a heartbreaking sight that every gardener knows all too well. While it is tempting to reach for a bottle of harsh chemical pesticides, you probably want something safer for your family, your pets, and the environment. This is where learning how to make pepper spray for plants becomes your most valuable skill.
This guide will walk you through everything you need to know to create a high-quality, professional-grade repellent that protects your plants without harming the world around them.
Why Pepper Spray Really Works
Before you start chopping peppers, it helps to understand why this method is so effective. The secret is capsaicin, a phenylpropanoid compound found in peppers of the Capsicum genus. To you, it feels like a burn when you eat a spicy wing. To a pest, it is a significant irritant that signals danger. In mammals like squirrels, deer, and rabbits, capsaicin binds to specific receptors called TRPV1. These receptors release neuropeptides that cause a burning sensation, coughing, and even temporary blindness if the animal gets too close.
For the smaller pests like insects and mites, the effect is even more dramatic. Capsaicin does not just taste bad to them; it actually damages their cell membranes by creating tiny holes in their outer layers. It also messes with their nervous systems and metabolic pathways. When you spray your plants, you are creating a barrier that deters egg-laying and forces existing bugs to move off the plant and onto the soil surface.
| Feature of Capsaicin | Impact on Pests | Benefit to Your Garden |
|---|---|---|
| TRPV1 Binding | Causes intense burning and irritation in mammals | Keeps deer, rabbits, and squirrels away. |
| Membrane Damage | Creates holes in insect cell walls | Kills or weakens soft-bodied insects like aphids. |
| Nervous System Disruptor | Interferes with pest metabolism | Prevents insects from feeding or reproducing. |
| Low Volatility | Does not easily turn into vapor | The spray stays on the leaves where it belongs. |
Choosing the Right Peppers for Your Spray
Not all peppers are created equal. If you want to keep a large bear or a determined moose away, you need a lot more “kick” than if you are just dealing with a few aphids. The strength of your spray depends on the peppers you choose. We measure this heat in Scoville Heat Units (SHU). In my experience, using cayenne peppers is the “gold standard” for home gardens because they offer a perfect balance of heat and availability.
When you are selecting your materials, you have a few options. You can use fresh peppers, dried flakes, or even concentrated powder. If you use fresh peppers, remember that the seeds and the internal membranes are where most of the heat lives. You should never discard them! If you find yourself in a pinch and do not have fresh produce, three to five tablespoons of red pepper flakes or two tablespoons of hot pepper powder can be substituted for every ten fresh peppers in a one-gallon recipe.
Understanding the Scoville Scale for Garden Use
| Pepper Type | Heat Level (SHU) | Best Used For |
|---|---|---|
| Bell Pepper | 0 | Not effective for pest control. |
| Jalapeño | 2,500 – 8,000 | Light insect infestations. |
| Cayenne | 30,000 – 50,000 | Most common garden pests and small animals. |
| Habanero | 100,000 – 350,000 | Larger mammals and stubborn insects. |
| Ghost Pepper | 1,000,000+ | Extreme cases like armyworms or heavy vertebrate pressure. |
Step-by-Step Guide How to Make Pepper Spray for Plants
To make a spray that actually sticks and lasts, you cannot just throw some peppers in cold water. You need to perform a thermal extraction. This is a fancy way of saying you need to cook the peppers to release the oils. Over the years, I have refined this recipe to ensure it is both potent and safe for your plants.
Step 1: Preparation and Safety
Your safety must come first. When you are dealing with concentrated capsaicin, you are essentially making a form of riot control spray in your kitchen. If you get this in your eyes or breathe in the steam, you will regret it. I always tell my readers to wear rubber or nitrile gloves and safety goggles before they even touch a pepper. If you are simmering the mixture on the stove, keep your face away from the steam. It can cause a painful coughing fit or nasal irritation.
Step 2: The Cooking Process
- Chop Your Peppers: Take 10 to 15 fresh cayenne or jalapeño peppers and chop them finely. Include the seeds! If you want to make the spray even more powerful, you can add 6 to 12 cloves of crushed garlic or a diced white onion for an extra “oomph” of repellent power.
- The Simmer: Place your chopped ingredients into a large pot with one gallon of water. Bring it to a boil, then lower the heat and let it simmer for 15 to 20 minutes. This draws the capsaicin out of the peppers and into the liquid.
- The Infusion: This is the part most people skip, but it is the most important. Remove the pot from the heat, cover it, and let it sit for at least 24 hours. Research from university extension services shows that rushing this step can reduce your spray’s potency by as much as 40%. If you really want a strong batch, you can let it sit for up to 48 hours.
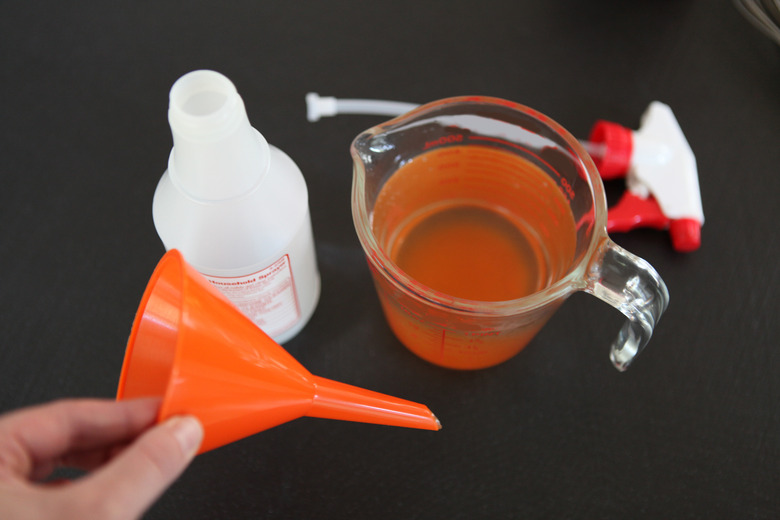
- The Strain: After your wait is over, use a fine-mesh sieve or a piece of cheesecloth to strain out all the solids. You want a clear liquid. If you leave chunks in the water, they will clog your spray bottle nozzle and make your job impossible.
Step 3: Adding the “Sticky” Factor
Water naturally beads off the waxy surface of many leaves. If you just spray pepper water, it will roll right off. To fix this, you need a surfactant. This is a substance that helps the liquid stick to the plant. I recommend adding two teaspoons of biodegradable dish soap or a pure Castile soap like Dr. Bronner’s to your strained liquid. Some gardeners also use a tablespoon of vegetable oil or neem oil to add extra staying power. Once your soap is mixed in, use a funnel to pour the liquid into a clean spray bottle.
How to Apply Pepper Spray to Your Garden
Now that you have your homemade repellent, you need to use it correctly. Timing and technique are everything when it comes to keeping pests away. In my experience, the best time to spray is in the early evening. At this time, the sun is not hot enough to burn your plants, and the foliage is usually drier than in the morning when dew is present.
When you are spraying, you must be thorough. Do not just hit the tops of the leaves. Many of your biggest enemies, like aphids and spider mites, love to hide on the undersides of the leaves where they are protected from the sun. You need to drench the entire plant until the liquid is almost dripping off.
Weather and Reapplication
Because this is a natural, water-based solution, it does not last forever. You will need to reapply your spray every 3 to 5 days during the peak of the pest season. The biggest challenge you will face is rain. Rain and overhead sprinklers will wash your hard work away in minutes. If it rains, you must go back out and respray as soon as the plants are dry.
| Application Factor | Recommendation | Reason |
|---|---|---|
| Time of Day | Early evening | Prevents sun-scald and hits nocturnal pests. |
| Frequency | Every 3 to 5 days | Capsaicin breaks down naturally over time. |
| Rain Policy | Reapply immediately | Water-soluble spray washes off easily. |
| Coverage Area | Top and bottom of leaves | Pests hide underneath to avoid predators and sun. |
Protecting Your Plants from “Leaf Burn”
While pepper spray is natural, it is still powerful. Some plants are more sensitive than others and can suffer from what we call phytotoxicity, or leaf burn. This looks like yellowing, shriveling, or brown spots on the leaves. I always recommend that you test your spray on one small leaf and wait 24 hours to see how the plant reacts before you spray the whole garden.
In my five years of work, I have noticed that young seedlings and very delicate plants like okra are more likely to be sensitive. If you see your plants struggling after a treatment, you can try diluting your mixture with more water. A 1:3 ratio of concentrate to water is often much safer for younger crops. Another trick is to wait 10 to 15 minutes after spraying and then lightly hose the plants down with fresh water. The capsaicin will have done its job of irritating the bugs, but the water will wash away the soap and oils that can sometimes trap heat and burn the leaves.
The Impact on Beneficial Insects and Pollinators
As a responsible gardener, you want to kill the “bad guys” without hurting the “good guys.” Unfortunately, capsaicin does not know the difference between a harmful aphid and a helpful honeybee. Pepper spray is toxic to bees and other pollinators. This is another reason why I emphasize spraying in the evening. Most bees have gone back to their hives by then.
To keep your garden buzzing with life, never spray directly onto open flowers where bees land to collect nectar. Focus your efforts on the stems and the green leaves. The good news is that because pepper spray breaks down quickly in the environment—usually within a few days in the soil—it allows natural predators like parasitic wasps to return much sooner than they would if you used a persistent chemical pesticide.
Common Garden Problems Pepper Spray Won’t Fix
It is important to have realistic expectations. Pepper spray is a fantastic repellent and a decent contact insecticide, but it is not a cure-all for every garden woe. In my five years of writing, I have seen many people try to use it for things it just can’t handle.
For instance, if your tomatoes are splitting or showing black mushy spots on the bottom (blossom end rot), pepper spray will not help. These are usually caused by uneven watering or calcium deficiencies in the soil. Similarly, fungal issues like powdery mildew or downy mildew require a fungicide, often made with baking soda or neem oil, rather than hot peppers. Understanding the difference between a pest problem and a nutritional or fungal problem is the key to becoming a master gardener.
Conclusion
Making your own pepper spray is more than just a chore; it is a way to connect with the natural cycles of your garden. It shows that you are paying attention to your plants and taking an active role in their protection. By choosing an organic, homemade solution, you are keeping your backyard safe for your family while still standing your ground against the pests that want to steal your harvest.
Remember to be patient. Organic gardening is not always about immediate results; it is about consistency. If you stay on top of your application schedule, wear your safety gear, and treat your plants with care, you will find that a little bit of heat goes a long way. Your garden will thank you with a bounty of healthy, beautiful produce that is as safe to eat as it is delicious. Happy gardening!
Frequently Asked Questions
Yes, you can use any pepper that has heat, but the more capsaicin it has, the better it works. Cayenne and habanero are your best bets for a strong spray.
It can. If your dog or cat walks on freshly sprayed leaves or digs in treated soil, it can cause burning on their paws or irritation in their nose and eyes. Keep your pets away from the area until the spray has completely dried.
To be safe, you should spray every 3 to 5 days. If you have a heavy infestation or frequent rain, you might need to do it every 2 or 3 days
Yes. Homemade pepper spray is most effective if used within a week or two. Over time, the water can grow bacteria and the capsaicin will lose its potency.
.
Can I make it in a blender? Yes! Some experts suggest pureeing the peppers, garlic, and water in a blender before letting it sit for 24 hours. This helps break down the plant cells even further and releases more capsaicin.