If you have been searching for guidance on how to build a compost bin at home, you are embarking on one of the most rewarding and sustainable projects a homeowner can undertake.
After years of designing, building, and maintaining various composting systems, I can tell you that the best method is the one you build yourself. By taking control of the design, you ensure optimal capacity, superior airflow, and the structural integrity necessary for long-term success. This guide will walk you through creating a highly efficient, high-performance compost bin that addresses the critical needs of the decomposition process, setting you up to produce rich compost effortlessly.
Why You Should Build Your Own Compost Bin
Building your own compost bin is a profound step toward true home sustainability. You gain three immediate benefits: you drastically reduce the amount of household waste sent to landfills, you save significant money previously spent on synthetic soil amendments and fertilizer, and, most importantly, you create a powerful, natural resource that dramatically improves the health and productivity of your garden.
The fundamental advantage of building your own system is the control you gain over the crucial operational factors. Commercial plastic bins, while convenient, often compromise on size or airflow, which can severely slow down decomposition. When you construct a DIY bin, such as the open-sided pallet design we will focus on, you are designing for high performance by maximizing passive aeration. Poor airflow is a primary cause of slow, smelly compost. By choosing a design that prioritizes air circulation, you are preemptively solving many of the common troubleshooting problems that plague beginners, ensuring a faster, more effective composting cycle.
Planning for Perfect Composting System
Before cutting wood or buying hardware, you need to make two key decisions: what material to use, and where to place your new composting powerhouse. These planning steps are crucial for ensuring the longevity and efficiency of your system.
Choosing Your Design and Material
While many materials are available for compost bin construction, the wooden pallet bin is widely regarded as the superior DIY choice. It strikes an excellent balance between cost (often free), massive capacity, and superior airflow compared to many enclosed plastic options.
However, understanding the material differences will help you choose the best route for your specific climate and goals.
1. Plastic Bins: These are practical, budget-friendly, and lightweight. Thick-walled plastic models, especially those colored black, excel at capturing and retaining heat from the sun. This insulation significantly speeds up the decomposition process, as seen in models like the Thermo Compost Bin Komp 420. However, plastic bins have environmental drawbacks, primarily due to low recycling rates, and prolonged UV exposure can eventually make them brittle.
2. Wood Bins (Pallet Focus): Wooden structures inherently allow for excellent passive airflow, which prevents the formation of anaerobic pockets that cause foul odors. While standard pine pallets are economical, hardwoods like cedar and redwood are naturally rot-resistant and offer better longevity, though they require maintenance to protect them from the elements.
3. Metal Bins: Materials like stainless steel offer outstanding longevity and durability, resisting rust and contamination. However, this level of quality comes with a substantially higher upfront cost.
When comparing the systems, you must consider the trade-off between heat retention and ventilation. Highly insulated materials (thick plastic) retain heat exceptionally well, driving rapid decomposition, but this efficiency requires very close monitoring of moisture to prevent stagnation. Conversely, the open structure of a wooden pallet bin provides such reliable passive aeration that it inherently reduces the maintenance burden of manually turning the compost, making it an excellent choice for consistent, low-effort composting.
If you choose the pallet route, you must perform a critical safety check: Pallets used for composting food scraps must be safe. Look for the “HT” stamp, which signifies that the wood was Heat Treated rather than chemically treated. You must avoid pallets marked “MB” (Methyl Bromide), as this chemical treatment can leach toxins into your soil, compromising the safety of the compost intended for your vegetable garden.
DIY Compost Bin Materials Comparison
| Feature | Pallet Wood Bin | Thick Plastic Bin | Stainless Steel Bin |
|---|---|---|---|
| Initial Cost | Low (Often Free) | Low to Medium | High |
| Durability/Longevity | Moderate (Needs care) | Durable but brittle over time | Outstanding longevity |
| Weather Resistance | Moderate (Requires care) | High (May become brittle from UV) | Excellent (Resists rust) |
| Heat Retention | Good | Very Good (Black, insulated models) | Moderate |
| Eco-Friendliness | High (Biodegradable) | Low (Plastic waste issue) | High (Recyclable) |
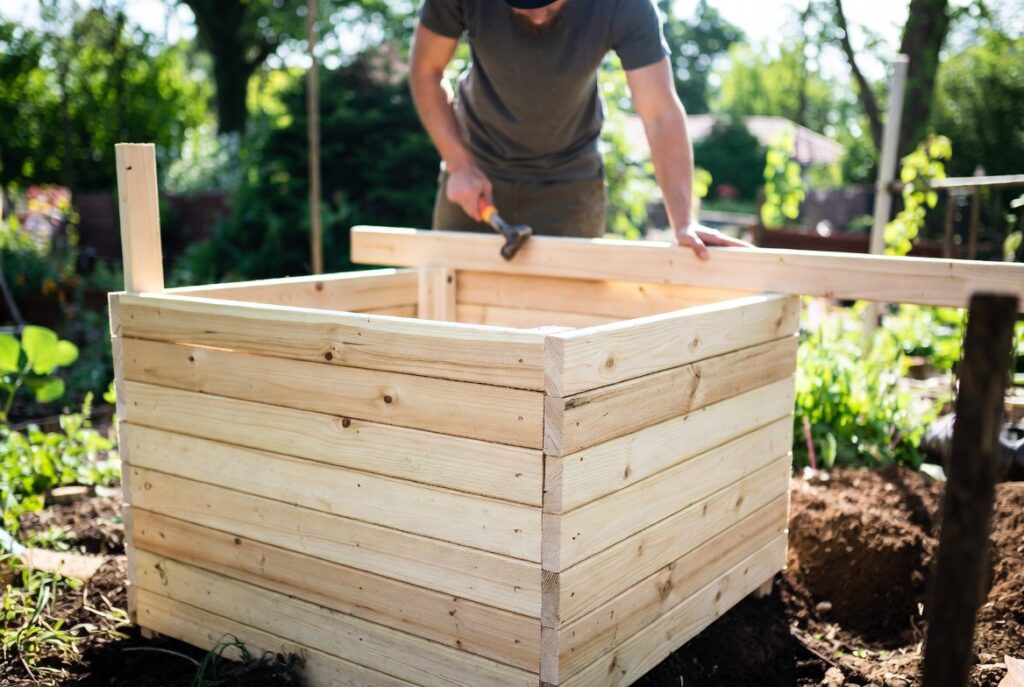
Building a High-Performance Pallet Compost Bin
The pallet compost bin design is effective because it creates a standard four-foot-by-four-foot cube. This size is ideal for generating the necessary internal heat for thermophilic (hot) composting while simultaneously allowing air to flow freely through the gaps in the wood.
Materials and Tools You Need
To construct the basic, single-chamber bin, you will need the following materials and tools :
Materials and Hardware:
- 4 similar-sized wooden pallets (Heat Treated, or HT-stamped).
- Wood screws (appropriate length for the pallet thickness).
- 4-6 L brackets (for structural reinforcement).
- 2 heavy-duty strap hinges (essential for the front gate).
- One gate hook and latch (or utility pull/handle and bungee cord).
- Optional: Chicken wire and a staple gun (for pest exclusion).
Tools:
- Power drill and screwdriver bits.
- Hammer (for fixing loose nails).
- Safety gear: gloves and safety glasses.
How to Build a Compost Bin – Step-by-Step Construction Guide
This guide focuses on creating a structurally sound bin with a functional front gate—the element that separates a chore from an easy maintenance task.
Step 1: Preparation and Selection Obtain your pallets and carefully check them for any nails that are loose or sticking out, hammering them back into place to prevent injury. Select the nicest, sturdiest pallet, as this piece will serve as the functional front gate.
Step 2: Assembling the Permanent Structure Fit three pallets together to form the back and two sides of the bin. Because a bin filled with wet compost becomes immensely heavy, the corners must be structurally sound. To achieve this, you will pre-drill holes and secure the two rear corners using L brackets. Place one bracket near the top and one near the bottom on each of the two back corners, screwing them in securely. This structural reinforcement prevents the corners from bowing outward under the intense pressure of a full, dense pile.
Step 3: Creating the Hinged Access Gate The hinged gate is the most critical functional upgrade. Since composting requires frequent aeration (turning) , and harvesting requires access to the bottom layer, a fixed front wall would make maintenance tedious. The hinged gate simplifies both processes, encouraging regular use.
Position the front pallet (the sturdy one you selected) against one side. Install the two heavy-duty strap hinges along this edge. You will pre-drill the holes before securing the hinges to both the front pallet and the side pallet. Once the hinges are installed, the door should swing freely. On the opposite vertical edge, install the cupboard handle/utility pull and the hook-and-latch mechanism. This latch is necessary to hold the door tightly shut, especially to deter pests from gaining entry.
Scaling and Protection
- Pest Exclusion: If you live in an area prone to rodents, you should staple chicken wire securely around the exterior of the three permanent sides. This modification maintains the critical airflow provided by the pallet gaps while physically excluding larger pests.
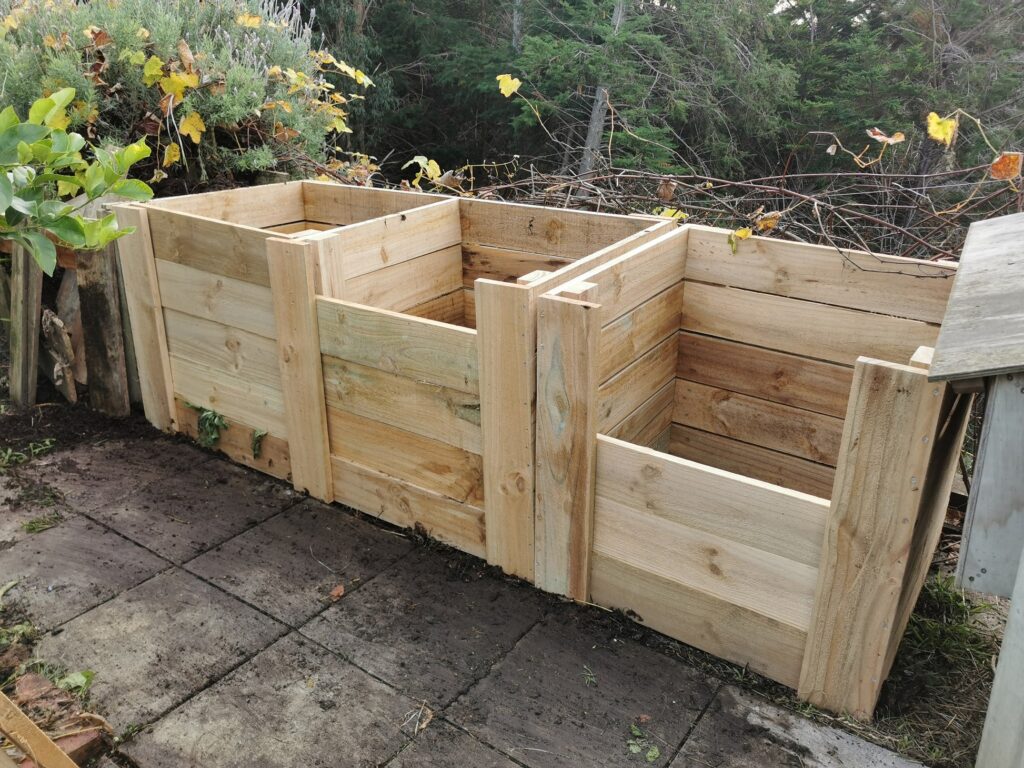
- Building a 3-Section System: For continuous, high-volume composting, you may want to build a three-section system, which requires 5 or 6 pallets and internal dividers. This advanced workflow allows you to maintain three distinct batches simultaneously: Section 1 for fresh inputs, Section 2 for actively turning materials, and Section 3 for finished, curing compost. This separation prevents fresh materials from contaminating the ready-to-use product.
The Science of Using Your New Bin
A compost bin is merely a container; true success lies in what you put inside. Composting is a biological process governed by the diet of beneficial microbes, which require a specific ratio of materials for optimal growth and activity. The key elements are Carbon (C), which provides energy and bulk, and Nitrogen (N), which provides protein for growth.
The Golden Ratio of Ingredients
The target ratio for efficient, hot composting is achieved when you combine 2 to 3 parts carbon-rich material (“browns”) to 1 part nitrogen-rich material (“greens”) by volume. This volume ratio provides the structural balance necessary to achieve the scientific ideal of approximately 30 parts Carbon for every 1 part Nitrogen by weight. Maintaining this balance determines the speed and quality of your finished compost.
Practical Breakdown of Browns and Greens
Understanding which materials contribute Carbon and which contribute Nitrogen is essential for managing your pile.
Greens (Nitrogen-Rich Sources): These are typically wet, fresh materials that break down quickly and generate heat rapidly.
- Grass Clippings (20:1 C:N): Grass clippings are highly nitrogenous. However, you must use them sparingly and mix them well. Adding large batches of wet clippings creates thick, matted clumps that instantly seal off air, leading to the common problem of foul odors and anaerobic conditions.
- Coffee Grounds (20:1 C:N): Coffee grounds are an excellent source of nitrogen that helps heat up the pile.
- Fresh Manures: Manures, such as poultry (7:1), cow (18:1), or horse (22:1), contain high levels of nitrogen, accelerating decomposition.
Browns (Carbon-Rich Sources): These materials are dry, fibrous, and provide the essential bulk, structure, and crucial air pockets that keep the pile breathing.
- Dry Leaves (50-80:1 C:N): Dry, dead leaves are a foundational brown material.
- Paper and Cardboard (150-200:1 C:N): Shredded cardboard is excellent, but avoid glossy or highly colored papers.
- Straw (80:1 C:N): Straw is valuable because, although it takes longer to break down than hay, it helps open up the structure of clay soils.
Preparation is Key: For high-carbon materials, particle size is directly linked to the speed of breakdown. The more surface area available, the faster the microbes can work. Therefore, you must shred dry leaves and break cardboard into small pieces before adding them to the bin.
Managing High-Carbon Materials: Materials with an exceptionally high C:N ratio require careful handling. For instance, Sawdust (400:1 C:N) is so carbon-rich that using it in excess will severely deplete the nitrogen available to the microbes, effectively halting decomposition. If you use sawdust, do so in small amounts and very thin layers. You must also never use sawdust from pressure-treated wood, as it can leach arsenic into the soil. Similarly, Wood Ash (25:1 C:N) should be used sparingly because its alkaline nature can raise the pile’s pH level, which ultimately limits beneficial microbial activity.
Carbon and Nitrogen Ratio Quick Reference
| Material Type | Example | C:N Ratio | Primary Role |
|---|---|---|---|
| Green (Nitrogen) | Poultry Manure | 7:1 | Heat generation, microbial growth |
| Green (Nitrogen) | Coffee Grounds | 20:1 | Accelerant, heat generation |
| Green (Nitrogen) | Grass Clippings | 20:1 | Accelerant (use sparingly) |
| Brown (Carbon) | Leaves (Dry) | 50:1 to 80:1 | Bulk, structure, air pockets |
| Brown (Carbon) | Straw | 80:1 | Bulk, soil structure improvement |
| Brown (Carbon) | Cardboard (Shredded) | 150:1 to 200:1 | Bulk, slow decomposition |
| Brown (Carbon) | Sawdust | 400:1 | Bulk (use sparingly, high risk of stall) |
Building Your Pile: The Lasagna Method and Structural Integrity
You must build your pile correctly to ensure success from the start.
Step 1: The Bulky Foundation Do not begin your compost pile directly on the soil surface. Instead, start with a non-negotiable four-to-six-inch layer of bulky brown materials, such as twigs and wood chips. This layer serves two crucial purposes: it absorbs excess liquids, acting as a crucial drainage system, and it elevates the working pile, allowing air to circulate freely at the base. This preemptively eliminates the common issue of a soggy, compacted, anaerobic bottom layer.
Step 2: Layering for Success Once the foundation is set, you should layer your ingredients like a lasagna, alternating between green and brown materials and strictly adhering to the 2-3 parts brown to 1 part green volume rule. This layering ensures that the nitrogen sources are distributed evenly throughout the pile.
Step 3: Initial Moisture As you layer, dampen the materials using your nearby water source. Water is essential for the composting microbes to work effectively, but there can be too much of a good thing. Aim for a moisture level that feels similar to a wrung-out sponge.
What to NEVER Add
The success of home composting hinges on proactive pest control. You must avoid adding materials that will attract rodents and flies. This critical exclusion list includes meat, bones, fish, dairy products, and greasy or oily foods. These items not only attract vermin but are also major sources of foul odors that can disturb neighbors.
For fresh fruit and vegetable scraps, you should always adhere to a strict protocol: bury these items deeply in the center of the active pile. This practice speeds up their breakdown and isolates them from the surface, drastically deterring flies and other pests.
Conclusion
The culmination of your effort is the transformation of waste into a rich soil amendment. You know your compost is finished when it exhibits three key characteristics: it is dark in color, it has an earthy, uniform smell (like forest floor soil), and the texture is consistent, with none of the original ingredients recognizable.
One of the great advantages of the hinged pallet bin is the ease of harvest. The front door allows you to simply unlatch and swing the gate open, providing access to the bottom layer where the oldest, finished compost is located. You can then shovel out the “black gold” without needing to disassemble the entire structure.