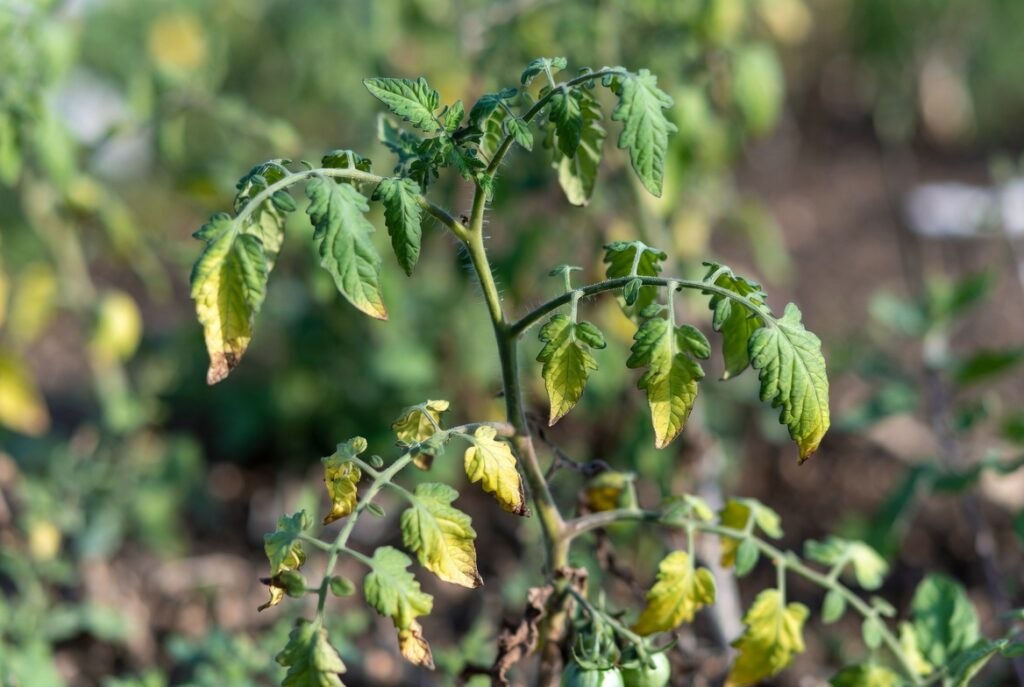
You put in the effort to keep tomatoes growing through the cold months — maybe in a sunroom, greenhouse, or heated garage — and then the leaves start going yellow. It feels like something is failing, and it’s hard to know where to start.
Here’s the honest truth: tomato leaves turning yellow in winter is not always a nutrition problem. In most cases, it’s your environment. Cold soil, weak light, and too much water are the real culprits — and throwing fertilizer at an environmental problem usually makes things worse, not better.
This guide will walk you through the most common causes of the yellow tomato leaves problem in winter, starting with what matters most: the physical conditions your plant is living in.
Cold Soil Is Often the First Problem

Tomatoes are warm-weather plants at their core. The roots need soil temperatures above 60°F (15.5°C) to function properly. Below that threshold, nutrient absorption slows dramatically — not because the nutrients aren’t there, but because cold roots simply can’t move them.
This is called cold-induced nutrient lockup, and it looks almost identical to a real deficiency. Leaves may turn yellow, pale, or even purplish — which mimics potassium or phosphorus shortage. Gardeners often respond by adding more fertilizer. But if the soil is cold, adding nutrients doesn’t solve the lockup. It just builds up salt in the soil.
What to do: Use a seedling heat mat with a thermostat and a soil probe. Insert the probe directly into the potting mix — not just resting on the surface. You want the actual root zone staying consistently above 60°F. Once the soil temperature is corrected, the yellowing caused by cold stress typically reverses on its own.
Winter Light Levels Are Usually Not Enough
Short days and a low sun angle mean your plants are getting a fraction of the light they need. Tomatoes are demanding in this regard — a sunny south-facing window in January doesn’t come close to summer conditions.
When light is insufficient, the plant can’t photosynthesize efficiently. Energy production drops, growth slows, and leaves begin losing their green color. This general yellowing is easy to mistake for a nitrogen deficiency, but the real fix has nothing to do with fertilizer.
What to do: Supplement with a full-spectrum LED grow light. Aim for 16–18 hours of light per day to replicate summer conditions. Keep the light positioned 12–24 inches above the canopy and adjust as the plant grows. Don’t push it to 24 hours — constant light can cause its own form of stress and actually reduce yield.
Look for an LED rated 200–600W depending on how many plants you’re managing. Quality matters more than raw wattage, so choose a reputable grow light with a full spectrum rather than the cheapest option available.
Overwatering Is Extremely Common in Winter
During the summer, tomatoes drink fast. In winter, everything slows — growth rate, transpiration, soil evaporation. If you’re watering on the same schedule as warm months, you’re almost certainly overwatering.
Saturated soil blocks oxygen from reaching the roots. Oxygen-starved roots suffocate, begin to rot, and stop delivering nutrients or water to the plant. The leaves turn yellow as a distress signal. By the time you see the yellowing, the root damage may already be significant.
This problem compounds quickly when cold soil is also present. Cold roots already function poorly — adding waterlogged conditions makes recovery much harder.
What to do: Let the top inch of soil dry out completely before watering again. When you water, do it slowly and deeply at the base of the plant. Never leave containers sitting in saucers filled with standing water. If you suspect root rot has already set in, check the roots — healthy roots are white and firm, while rotted roots are brown, mushy, and may have a foul smell.
The Potassium Trap Worth Knowing About
Here’s a scenario that catches a lot of gardeners: cold soil causes potassium lockup, leaves show yellowing or purpling that looks like a K deficiency, and the natural response is to add a potassium-rich tomato feed.
The problem is that excess potassium in the soil actively blocks magnesium absorption. So you fix a perceived potassium shortage, and then a genuine magnesium deficiency develops. Now you’re managing two problems instead of none.
This is exactly why environment comes first. Fix the soil temperature, fix the light, fix the watering — then reassess. Don’t add fertilizers to a plant that’s stressed from cold or waterlogging.
How to Read the Yellow Leaves (If the Environment Is Fine)
If you’ve confirmed that soil temperature, light, and watering are all correct — and the yellowing continues — then a genuine nutrient deficiency might be present. The key is reading the pattern carefully.
Location Tells You Which Type of Deficiency
Mobile nutrients — Nitrogen, Magnesium, and Potassium — can be moved by the plant from older leaves to new growth. So deficiencies in these nutrients appear first on the lower, older leaves.
Immobile nutrients — Iron and Manganese — cannot be relocated once fixed in leaf tissue. Deficiencies here show up on the youngest leaves at the top of the plant.
Pattern Tells You the Specific Nutrient
Uniform yellowing (entire leaf surface including veins turns pale): This usually indicates Nitrogen deficiency. The plant is running low on its most essential building block.
Interveinal chlorosis (leaf tissue turns yellow but the veins stay green): This pattern points to Iron, Magnesium, or Manganese. Location narrows it down — top leaves mean Iron, bottom leaves mean Magnesium.
Quick Deficiency Reference
| Nutrient | Leaves Affected | Pattern | What to Look For |
|---|---|---|---|
| Nitrogen | Old (bottom) | Uniform yellowing | Whole leaf pale, including veins; general lack of vigor |
| Magnesium | Old (bottom) | Interveinal (veins stay green) | Yellow patches, may progress to brown spots |
| Iron | Young (top) | Interveinal (veins stay green) | Almost always tied to high soil pH |
| Potassium | Old (bottom) | Leaf edge scorching/yellowing | Marginal browning or yellowing; affects fruit quality |
Magnesium vs. Iron: These two look nearly identical in pattern, but location separates them clearly. Iron deficiency hits the top first; Magnesium hits the bottom first. Magnesium deficiency is especially common in container plants because it leaches easily out of potting mix. A diluted solution of magnesium sulphate (Epsom salts) applied as a foliar spray or soil drench usually resolves it within a week or two.
Iron deficiency is almost always a soil pH issue. If your mix is too alkaline, iron becomes locked up regardless of how much is present. Test pH and bring it into the 6.0–6.8 range before treating with iron supplements.
Don’t Overlook Pests and Disease
Check the undersides of leaves regularly. Spider mites leave tiny specks and faint webbing; whiteflies scatter when disturbed; aphids cluster near new growth. If pests are found, wash leaves with a strong stream of water first, then treat with neem oil or insecticidal soap if needed.
On the disease side, Tomato Chlorosis Virus (ToCV) is worth knowing about if yellowing persists and the leaves become brittle or begin to roll. Unlike nutritional chlorosis, ToCV doesn’t improve with any intervention. Isolate and remove affected plants immediately to protect the rest of your crop. Whiteflies are the primary vector, so controlling them is your best prevention.
Step-by-Step Fix: What to Do First
Work through this in order. Don’t skip to fertilizers until you’ve confirmed the first three are handled:
Step 1 — Measure soil temperature. Use a probe thermometer inserted into the potting mix. If below 60°F, add a heat mat with a thermostat immediately.
Step 2 — Review your watering. Let the top inch of soil dry before watering again. Remove any trays with standing water.
Step 3 — Check light levels. Is your plant getting 16–18 hours of quality light? If not, add a full-spectrum LED grow light.
Step 4 — Inspect for pests. Check leaf undersides on every plant. Treat promptly if anything is found.
Step 5 — Diagnose a true deficiency (only if Steps 1–3 are confirmed correct):
- Yellowing on old leaves, veins included → Nitrogen deficiency → apply balanced fertilizer
- Yellowing between veins on old leaves → Magnesium → apply Epsom salts
- Yellowing between veins on new leaves → Iron → test and correct soil pH
- Leaf edge yellowing/browning on old leaves → Potassium → apply tomato-specific feed
Step 6 — Monitor for ToCV. If nothing improves and leaves become thick, brittle, or roll inward, remove the plant and control whiteflies immediately.
Wrapping Up
The yellow tomato leaves problem in winter is frustrating, but it’s almost always solvable once you understand what’s actually causing it. In most cases, the answer is cold soil, poor light, or overwatering — not a missing nutrient. Fixing the environment first is what saves plants that fertilizer alone would never help.
Be methodical. Work through the checklist above before reaching for any amendment, and you’ll spend less time guessing and more time actually growing.
Frequently Asked Questions
Winter changes three things at once: light intensity drops, soil temperatures fall, and evaporation slows — which means water sits longer. Any one of these can cause yellowing. In summer, all three are naturally corrected by outdoor conditions
Yes, if the underlying cause is caught early and corrected — especially with environmental causes like cold soil or overwatering. Leaves severely damaged by root rot or disease may not recover, but new healthy growth should emerge once conditions improve.
Gently remove the plant from its pot and examine the roots. Healthy roots are white and firm. Rotted roots are brown, slimy, and may smell unpleasant. Trim away rotted roots with clean scissors and repot in fresh, well-draining mix if root rot is caught early.
Far less than in summer. Most container tomatoes in winter need watering only every 7–10 days, depending on pot size, plant size, and humidity. Always let the top inch of soil dry before watering again.